Showing posts with label wool. Show all posts

Monday, July 28, 2014

Anise Jacket (and bonus Papercut Pleated Pants)

About 14 months ago, I started an Anise Jacket. I muslined it, bought the wool/cashmere fabric, silk lining, thread, interfacing etc. I started sewing and trialled bound buttonholes on scraps (my fabric was far too thick for bound buttonholes - at least at my skill level). I decided I'd get do something else with the buttonholes. I basically sewed the jacket to the point of buttonholes and buttons. I put it on my dressmaker's form and admired it for the next 12 months. That's right. I didn't touch it for 12 more months until I decided it was cold, and I needed jackets.

I investigated getting the buttonholes done professionally. There is one person in Melbourne who offers that service that I could find, and I was informed by someone who is 'in the know' that that person has been known to completely ruin garments people have paid them to sew buttonholes in. That meant one thing only.... I would have to sew these buttonholes myself.

Cue a few sleepless nights (joking... sort of), me reading every internet resource available, talking to Kate at Buttonmania (and buying required resources for hand stitched buttonholes), and obsessive reading of Claire Schaeffer's Couture Sewing Techniques. I then started them. Only to absolutely hate my first four attempts. Let me tell you, unpicking silk thread on a very thick wool/cashmere is not fun at all. I may have had a small hissy fit. I left them for about a month. And then picked everything up again, wore a small running head torch on my head (doing fine stitches on that bloody wool/cashmere was really, really hard to focus on) and got them done.

I now have an Anise jacket that has been serving me well on these cold Melbourne days.


The fabrics were purchased from Darn Cheap Fabrics. They actually have a very nice selection of wool coatings. This is a wool cashmere blend and was only $20/m. The colour is lush.


I really like the 60's vibe this jacket gives off.


Awesome silk lining. I am slightly obsessed with silk as a lining.
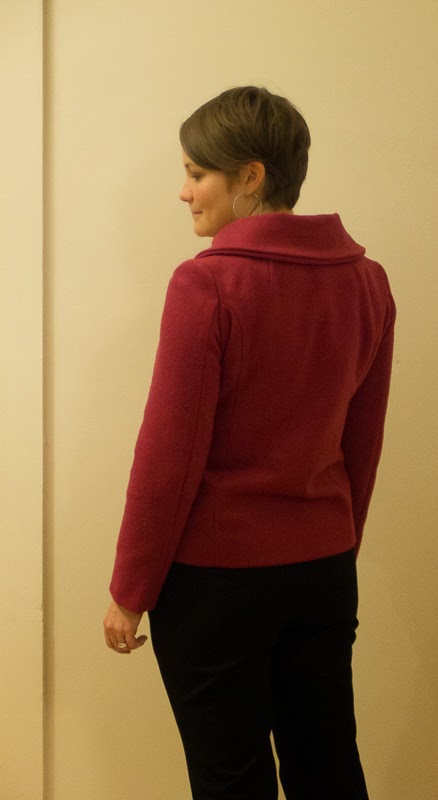

Back view. If I knew what I did now when sewing this, I would have adjusted that under collar piece to account for turn of cloth. Ah well, you live and learn.


The buttonholes. They're not perfect, but they're okay. Liveable. The buttons came from Clegs.

I did not keep notes around making this jacket. The only adjustment I remember doing was to take some out of the CB. Apart from that, I made a size 8. Other things I would do in the future is to add in a sleeve head piece, maybe use a slim shoulder pad, and investigate why there are odd wrinkles coming down from the top of the sleeve (I have seen this on every Anise made - something weird with the pattern?).

My Anise was an odd make, mostly due to the extremely disjointed sewing process, but I enjoy wearing it now. I receive compliments every time I wear it - I think mostly due to the lovely colour. I don't think I'll make it again though. It is a fun jacket, but not a style I am totally gaga in love with.

Speaking of being gaga in love, meet my new Papercut Pleated Pants. I won't bore you with the details of these, seeing as I have made them before, but I absolutely love these. They're made from a black viscose-blend suiting remnant I got from Tessuti, and they are my perfect pants. Slightly slouchy, they sit at the perfect point on my waist, are very comfortable and look awesome with my patent brogues. I'm so glad I revisited this pattern, and will be making more.


I better get back to the Bellatrix Blazer I'm making for a special event coming up though - what are you making at the moment?

Wednesday, June 26, 2013

Briar. And Anita.

You know one of the things I most love about having some real life sewing friends (apart from having awesome friends)? I can try on their sewn garments to (a) see if they look good on me and (b) check the fit.

This is what I did when I went over Anna's a few weekends ago and she was wearing her Megan Nielson Briar top. Readers, I cannot lie. I nearly ripped it off Anna's back. But I thought that would be rude so I politely waited until we were combing through her amazing wardrobe and calmly tried it on instead.

Luckily for me, it fit like a complete dream, simply needing 2cm added to the length of the front. So I made myself the size L with the added length, and ended up with a beautifully warm jumper:

See my cute green beads from yesterday? Little M wore her pink and purple ones out today too and we had quite a few comments about Mummy & Me matching outfits. Not sure how I feel about that!


This Briar is made from a Merino wool knit - quite a thick one - from The Fabric Store on Brunswick St. Luckily this pattern doesn't need much fabric, because I got sucked in to the tune of $38/m. But I have to say - this is THE most lusciously warm knit - I wore it out tonight for dinner and didn't wear a coat, despite it being coat weather. 


What can I say about this pattern? It comes together like a dream. I LOVE the way the neckline binding is attached (sorry, I forgot to get a close-up sans scarf). It just looks so professional. The merino was also a dream to sew. Despite some initial hesitation, I also really love the high-low hem. I think it is a cool way to layer. I'm not sure I'd wear the Briar without another layer underneath. After having my appendix out and giving birth, my tummy muscles are not as tiiiiight as I'd like them to be. So no midriff peeks from me. 


I also have to report that I have made another (two!) pair of Anita Ponti Pants. My previous Bleach Boys pair gets a serious workout, so I bought some extremely thick black ponti from Tessuti. I originally made this ponti into a pair of Style Arc Sailor Sue Palazzo Pants and the ponti was such a bad fabric choice that I refashioned them into these Anitas. I sized down for this pair too - really sized down. I would estimate these are at least a size 6 in the waist and leg - possibly smaller. I started with my size 10 but the first time I wore them spent the day hoiking them up. So I unpicked the waist and the hems and made them a lot smaller.


This Briar and a pair of Anita Pants has been my go-to outfit over the last while. I love the combo, and it keeps me super warm on these horrible chilly Melbourne days we've been having (although the last two days have been beautifully sunny). I love the outfit so much that I have made another Briar and another pair of printed Anitas that I will show you soon.

So - what is your take on the Briar? Are you a fan of the high-low hem?

Saturday, September 24, 2011

Tessuti's New York Cape Pattern

After sewing my second Lady Grey this year, I had been seriously hankering for more winter sewing. I thought about making a jacket, but then Tessuti released their New York Cape Pattern, and I decided that a hooded cape would work a treat!!


The pattern was expensive ($35), but I really wanted it... :-) It came printed on printer paper, with black and white photos and instructions on A4 paper. The cape is unlined, and all edges are finished with poly-cotton hong kong binding for the inside and wool binding for the outside.

I found the pattern very easy until I got to the wool binding. I sewed the binding on according to the instructions, but it looked awful. It was all wonky and the edges were wavy. I don't know what I did wrong, but I unpicked it, sewed it again and it still looked awful. My next attempt was to sew it in by hand. Thats 10m of hand stitching. It still looked dreadful. So I unpicked it and sat down for a while and thought about it.

I realised that the binding was too short in length. I also realised that if I was going to sew it in by hand I should only use a single thread, not a doubled-over thread. So, off I trotted to Tessuti to buy more binding. I bought half a meter more than the pattern suggests.

I sewed it in by hand, and here is what I came up with!


I am very happy with it now. I did do a few other things differently than the pattern instructions. I added a line of topstitching along the edge of the hood, as the layers of wool were a little bulky. Now it sits flat.


I also hand-sewed the buttonholes. To do this, I consulted Shaeffer's Couture Sewing Handbook. I used silk thread and a buttonhole stitch. I am really proud of them:


The fabric is from Tessuti - a dark navy wool/cashmere blend, the wool binding is also from Tessuti and is black, and the black buttons are from Spotlight.

This project took me a loooong time... but I am really happy with it. I think it will be great for Melbourne's spring - not really cold but not warm yet either. I wore it this morning out to breakfast and it was perfect!