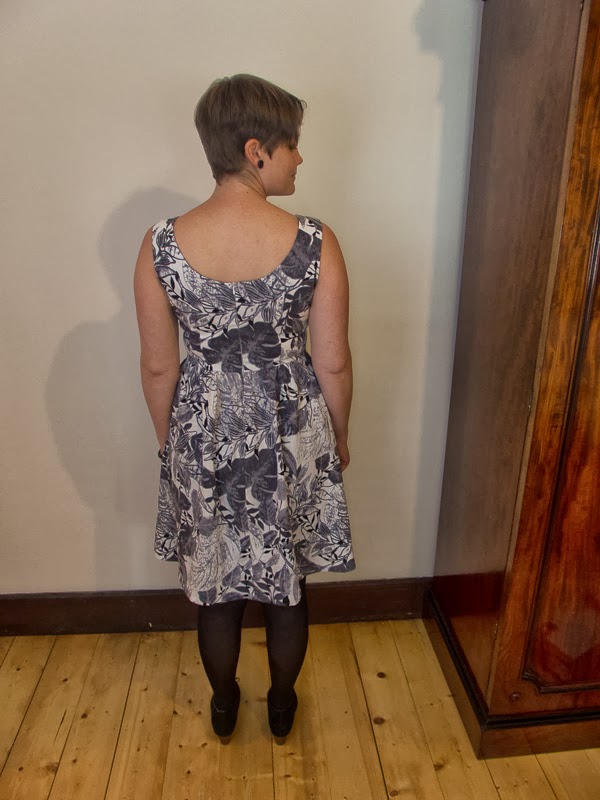
Showing posts with label fitting. Show all posts

Wednesday, June 11, 2014

Red Moneta

Like everyone else in blogland, I decided to jump on the Moneta bandwagon. I almost didn't as last year I made the Dixie DIY Ballet Dress twice. To be truthful however, I have never been super happy with either of those makes, primarily due to the skirt almost hugging my tummy. There is nowhere to hide in those dresses, especially when you've eaten. I don't like feeling like I have to suck my tummy in. So I thought I've give Moneta a shot, given it has a gathered skirt.

I REALLY should have edited this photo before uploading it. Untidy bedroom in the background ahoy!

I used a very soft cotton knit from Clegs. The pattern asks for too much fabric -  I made this out of about 1.6m of fabric.


I made a size Small, and lengthened it 2cm at the waist, and 2cm in the skirt. I did this as the cotton knit is not at all weighty, and other sewists had noted heavier knits pulled the bodice down, eliminating any need for lengthening. Obviously, I had the opposite problem. When I made my Jaywalk Moneta/V1027 mash-up, I didn't lengthen the bodice as the viscose Jaywalk fabric is quite weighty.

I also used the extra-large width at the shoulders only - using a larger shoulder width is a standard adjustment for me now.


I am pretty happy with this dress. There is one area I'm not happy with - the excess fabric in the upper-side-bust:
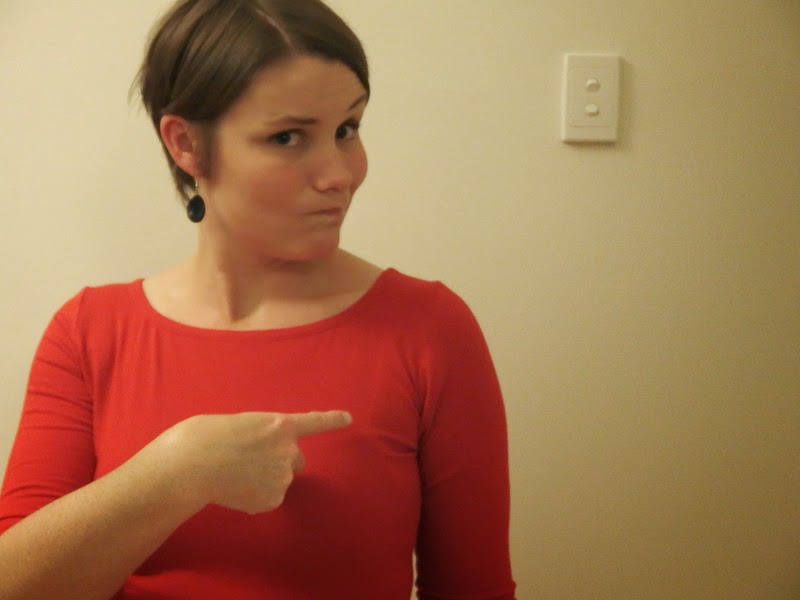

I've noticed this issue on almost every Moneta made up. Anyone know why this is happening? It's not enough for me to really worry about it in terms of wearability, but I am fascinated regarding why this is happening.

I've got two more of these planned. They are just so easy to wear and are a pretty cute silhouette. Are you going to get your Moneta on?

Monday, December 9, 2013

By Hand London Charlotte - Tropical Style!

Two posts in one week! Well, I'm home with a nasty cold/sinus infection so I'm catching up on posting garments I've had photographed for a while but haven't written the post for. Michael has moved the desktop computer into our bedroom so I can watch DVDs in bed, so I'm currently flat on my back blogging.

My new job allows me to wear pretty much whatever I like (yay for Academia!). I wouldn't wear jeans, but I can definitely move from being strictly corporate - which I love! This move away from corporate did mean however I needed a few pieces to wear to work. I decided to try the By Hand London Charlotte Skirt.


The fabric is a tropical print cotton sateen from Clegs. Pretty cool!


I made a size 6 and started with a muslin in some cheap sateen I got from Spotlight ages ago. I am going to be very honest here and say I found the pattern to be very difficult. Like Amy, I had a weird pouchy area at about the groin level. I had to essentially create a massive dart going across the front and back from side seam to side seam to remove the excess fabric.

I also had to significantly lengthen the darts and move them so I didn't have pouchy-ness going on. I added a back vent - but kind of stuffed this up and had to sew it on, meaning I didn't have enough of a vent. Ah well. I can walk fine in it and no one can tell so it is okay.


Finally, I didn't remove any length from the pattern - I guess I am tall enough for the By Hand London draft!


So - what do you think? I like my skirt but I must admit I found the fit baffling. I'm used to making adjustments to patterns but the weird pouchy thing at the groin level flummoxed me. I really like the pencil skirt look - can anyone recommend another good pencil skirt pattern?

Thursday, October 31, 2013

Vogue 1314: With Powder Puff Added

Hi! I am currently beginning a five-day-whole-house-to-myself-break. Michael has taken Little M to Sydney to see his folks and I have to work on Monday, so here I am by myself until Tuesday arvo (Tuesday is a public holiday here in Melbourne - it's Melbourne Cup Day). I'm working from home on Monday and doing lots of girls-only things. Like going to Geelong for a fabric shopping afternoon, tapas and drinks with Anna and Renay on Saturday and movies and dinner with Ruthy and a friend on Sunday night. And sewing of course.

The purpose of this post however is to show you my new work dress, another Vogue 1314.


I used the lining pieces for this one as I didn't want the ruching. The fabric is a ponti remnant I got from Tessuti, and while it is a lightweight ponti I don't think it would have gathered well. I also left off the sleeves (obviously!).

I sewed the size 10 lining pieces as this ponti is not overly stretchy - it is definitely not as stretchy as the other ponti fabrics I have sewn with.


I am mildly annoyed with myself. Can you guess why? When I look at the above photo all I can see is a white circle positioned right where my nipple points too. I didn't even slightly consider cutting layouts with this. Michael assures me it isn't noticeable, but it is all I can see. Grrrrrrrrrrrr!!!


Now I'm looking at this photo it looks like I'm wearing a powder puff bunny tail. Bloody hell. I am an idiot.

Well, there you have it. My non-ruched Vogue 1314 with powder puff bunny tail added. If only I'd wore it yesterday it could have passed for a Halloween costume.

Pattern: Vogue 1314
Fabric: Remnant of 'Potion Commotion' ponti from Tessuti.
Notions: Knit stay tape
Alterations: Used lining pieces so no ruching.

Tuesday, October 15, 2013

Sew Nice I Made it Twice: A Liberty Cambie

I'm totally on fire with my blog post titles aren't I?

I actually made this Cambie not long after I made my last one. I like to strike while the iron's hot. I haven't gotten around to posting about it because I haven't really worn it - for some reason when I initially wore it I didn't like the way the fabric colours went with my skin tone. But today I got over that.


I made this one in the Liberty print called Wiltshire. I think paired with solid, dark accessories it is okay on me. It is not quite as vibrant as I had thought when purchasing it.

Onto the pattern .... nothing new to add from my original one. Here is a recap of the alterations I had to make:

  • I started with a size 8 bodice, but ended up taking it in about 1.2cm on each side.
  • I pinched about 1cm out of the middle of the sweetheart neckline.
  • I shortened the straps by 1.5cm, tapering to 2cm at the bodice.
  • I took 1.5cm out of each back piece from the top - tapering to nothing at the bottom.
  • I shortened the bodice by 3cm.
Things I really like about this version include the pockets. Very useful for my work ID and keys. 


The back sits nice and flat, as does the front of the bodice.


So... a non-blogged item sees the light of day! I am glad I dragged this out today. It was comfy and made me feel nice. Wearing Liberty was a much needed event after my Washi dress on Saturday :-) 

I'll leave you with this final photo. I asked Michael for more direction for posing for blog photos. He told me to think of seahorses. 20 points if you can identify which movie he was referencing - one of my all-time favourites for a good snorting laugh!! 


Saturday, October 12, 2013

W-w-w-w-ashi Dress

Happy weekend to you all! Ours is drawing to an end here, but it has been a fun one.

Yesterday we had Little M's daycare open day. I volunteered at the cake stall and it was a beautifully warm day. So I wore a frock. A Made By Rae Washi frock.


I actually made this a while back, but for one reason or another I haven't worn it. I do like it, but I find it slightly constricting due to the wide elastic at the back, and the cotton very slightly rough.


I made a size M in organic cotton by Rashida Coleman-Haye. You can enter her name on etsy and find it easily. It was about $13/m. I would describe this as a nice quilting cotton. I haven't made a garment in quilting cotton since I learnt to sew, and I find it a little rough against the skin - more so because this dress is unlined.

I made a size M and added 5cm in length to the bodice. I also used an elastic casing with 3cm wide elastic at the back instead of the shirring. I regret this as I think it makes the front bodice too firm. Apart from that I made the dress as per instructions.


Piggie tails! Her first ones ever. Ridiculously gorgeous. 
So there you have it. A Washi dress. I got a lot of lovely compliments yesterday, but the truth is that I don't feel that comfortable in it. I also feel like there is a slight pregnancy vibe to it. I think I look better with a bodice that is fitted to my natural waist, rather than this empire style. I also don't think I'll be going back to this type of cotton either - maybe I've spoilt myself after sewing so much Liberty Lawn? Mmmm... Liberty Lawn. So buttery and soft.

Pattern: Made By Rae Washi Dress
Fabric: Rashida Coleman-Haye organic cotton
Notions: 3cm wide elastic
Alterations: lengthened bodice by 5cm, changed shirring to elastic casing

Saturday, September 28, 2013

Simplicity 1803: The King Kong Dress!

Disclaimer: This dress has nothing to do with King Kong, apart from the fact I wore it to see the musical this afternoon!

For my birthday earlier this month, Ruthy (my sister) bought me a ticket to go and see King Kong today the musical at the Regent Theatre on Collins St. It was so much fun! The huge-scale puppetry is amazing. Such a great birthday present!


Here we are before we went in. Look at the interior of the theatre! It is amazing.


I had originally planned to wear my Frocktails outfit - I wanted to get dressed up - but the weather in Melbourne presently is what can only be described as awful. Cold, windy, wet. Yuck. I needed something I could wear with tights, a cardigan and a coat.

Luckily a while back I started on Simplicity 1803:


I made it in a linen-rayon I bought on my recent Brisbane trip. This fabric is so lush. It drapes beautifully and feels very nice. Wish I'd gotten more. I underlined the bodice only as the bodice is faced rather than lined. I used cotton voile to underline. 


I didn't muslin this dress - so daring and uncharacteristic of me! I did have to make two adjustments to the size 12:

  1. Increase the CF seam allowance to 2.5cm instead of 1.5cm. Lots of gaping happening and too much room in the waist.
  2. Shorten the straps and angle them in more so there was no gaping. 
Overall I'm pretty pleased with the fit now. 


Love that scoop neckline. I also love the way the straps look - you can't really see it with this print. I'm planning a solid red version in linen. I had actually planned this to be a summer dress, and I was going to photograph it with some yellow shoes I got for my birthday (from Elk!). But it is just too cold here to go bare-legged. I'm really yearning for summer this year - it is my favourite season, both weather wise and sewing wise - how about you? What is your favourite season?

Pattern: Simplicity 1803
Fabric: 2m linen-rayon blend, 1m cotton voile
Notions: 16" invisible zip
Alterations: increased CF seam to 2.5cm, shortened and angled in front straps.

Sunday, September 15, 2013

Grainline's Maritime Shorts

Here is the last thing I sewed for my Queensland holiday with Little M - the Maritime Shorts Pattern from Grainline Studios.


Do you know I forgot to get a single outfit photo of me while I was away? I was too busy taking photos of Little M with her three little cousins. Ah well. I wore this outfit on Wednesday (one of my at-home days) -  it was probably actually a little too cold to wear shorts!

Anyway, onto the pattern. I didn't make a muslin for these. Instead I started with a size 6 (the size Moss Mini I wear), and then measured the crotch length of the pattern against a pair of Country Road shorts I have and love. I lengthened the back crotch curve by 3cm and the hem length by 3cm and that was that.

I think they fit well. Maybe a little loose across the back waistband. I might take a wee bit out of the centre back for my next pair.


The pattern came together easily, just like the Moss Mini. The construction is very similar in fact. I made them out of a denim from Tessuti called Costner - now sold out. It is a lovely denim.


I initially worried they were going to be too short, but I actually like the length. Short but not ass-cheek hanging out the back short. I am a bit self-concious of my extremely white legs though. And I need to do a few squats to tone 'em back up!


I also made this t-shirt, from a Dolce and Gabbana jersey I got from Tessuti at 50% off. Yay for sales! This is the Alexa Tee pattern with the Briar neckline. I'm still not sure the neckline suits me as a t-shirt. What do you think?

So.... my first pair of me-made shorts. I think I like them! I don't wear shorts often, but I must admit these are extremely comfortable. I think they will get a lot of wear in the summer here. Do you think they would work in linen (surely everything works in linen!)?

Pattern(s): Grainline's Maritime Shorts and a frankenpattern of Tessuti's Alexa Tee Top and Megan Nielsen's Briar Sweater.
Fabric: shorts - 1m Costner denim from Tessuti. Shirt - 1.4m Dolce & Gabbana jersey from Tessuti.
Notions: 7" regular zipper, stay tape for the shirt.
Alterations: shorts - lengthened back crotch by 3cm and lengthened hem by 3cm.

Tuesday, September 10, 2013

The Academic Archer

I started my new job on Monday! I have made the move back into academia and I am so pleased. I don't think policy and research for the government was the best fit for me, so I am extremely happy to be doing research regarding sexual violence for a university again. I'm also really chuffed as the two academics I'm working for are AMAZING. Their work is incredible, and to make things even better they are really lovely women. They also each have a 2 year old, so they understand that I can't stay until late every day and occasionally I may need to leave due to my babe.

To celebrate my new job, I sewed myself another Liberty Archer shirt and a new pair of Colette Clover pants.


I didn't change much from the last time I sewed this Archer. The only change was to shorten the sleeves by 3cm. Much better!


I made it in the Edenham Liberty print, purchased from Shaukat. I really do think Liberty lawn is ideal for the Archer. It makes it incredibly easy to sew - which, to me, is a good thing as I still find sewing a collared shirt a bit intimidating.


The pants.... the weirdest thing happened with these pants. A while back I did the pants fitting class at Tessuti. I used the Clover pattern as my pants to be fitted. So I used the modified pattern to sew these, and THEY DIDN'T FIT. They were far too big and way too short. Weird huh. And annoying as  I used really nice fabric from Tessuti to sew them. I had to order some other fabric for this pair (also from Tessuti), and I used my old pattern that I had modified myself. They fit just fine.


So... I'm kinda pleased with myself with this outfit - can ya tell??

Yay for academic jobs where I don't have to wear corporate anymore!

Pattern(s): Grainline's Archer Shirt and Colette Patterns' Clover Pants.
Fabric: 2.5m Liberty Edenham from Shaukat and 1.7m stretch black cotton from Tessuti.
Notions: 9 buttons, interfacing, 7" invisible zipper.
Size: 8 for the shirt, 6 (with a fair bit taken out to make them more snug) for the pants.
Alterations: Shirt: made sleeves 3cm shorter. Pants: have no idea - would have to look up post from when I first made them!

Thursday, August 29, 2013

Suzy (Pants!) in New Orleans

I have a pair of Elk Pants that I have worn consistently since buying them a year ago. So much so that a friend recently bought me the green ones as a gift. I've always wanted to make my own similar pair as I love them so much, but haven't ever found the right pattern.

Until Tessuti released their Suzy Pants Pattern.

Readers, I cannot lie to you. I love this pattern. It is simple and fits my aesthetic perfectly. I love a comfortable, funky pair of pants that I can wear with a t-shirt. I first muslined these pants in a viscose faille, but I actually found that the drape was not right - perhaps the fabric was a wee bit too heavy. I also found I needed one crucial adjustment (more on that below). So I bought a silk crepe de chine called 'New Orleans' from Tessuti.


The drape of the silk crepe de chine is perfect for these pants. If you are going to make them (and you should!) I highly recommend a lightweight fabric.

Sunshine!! Yay for Spring!
I wanted these pants to be very similar to the Elk pants, so I lengthened both the front and back crotch curves by 3cm each. I wanted to wear these just below my belly button (although my Elk ones sit just above my hip bones). I made a size small and didn't make any further adjustments. I think they are just about right.


The crepe de chine was lovely to sew. Very stable. I used a 'sharps' needle and sewed sloooooowly. I handstitched the hems, and used a wider elastic than the pattern calls for - they ask for 1.2cm elastic, but I only had 2cm wide stuff, so that was what I used.


I'm wearing them here with my Elk sandals, Sportsgirl t-shirt, and a Funkis necklace I got in Sydney on the sewist's meet-up.

These are definitely coming to Brissie with me tomorrow! They will be lovely in hot weather. They are loose and airy and made in breathable fabric. So - what do you think? Are you going to make the Suzy pants?

Pattern: Tessuti's Suzy Pants
Fabric: 1.8m of silk crepe de chine from Tessuti
Notions: 2cm wide elastic
Size: small
Alterations: lengthened back and front crotch curves by 3cm each.

Tuesday, August 6, 2013

Grainline's Archer in Liberty Paisley

I have wanted a smart button-up for ages. My friend Maree in Brisbane wears sharp button-up shirts and wide-leg pants and always looks incredibly chic, and I've always wanted to emulate her look. But I guess I've been a little scared of the old button-up shirt. Plackets, button bands, collar stands - aaaahhhh!! Scary stuff.

When Grainline released their Archer Shirt I knew I would delve into the unchartered sewing territory of button-up shirts. Mostly because it is an awesome looking pattern, and also because Jen did an Archer Sew-A-Long that I followed to sew my first Archer. In addition, I love my Moss Mini pattern so much I knew the Archer shirt would become a long-time friend of mine.

And it has.


I've wanted a paisley button-up after seeing a 70's film star wearing one. I can't remember for the life of me who it was - maybe Diane Keaton? Anyway, I went searching for an appropriate paisley and found this Liberty Lawn on the Shaukat site - it is called 'Bourton'.

So.... the pattern. This is a size 8 with no alterations. Can you believe it? I do have one thing I will change for next time.... I need to make the sleeves slightly shorter.


I was a bit naughty and didn't muslin the cuff. Muslined everywhere else, but not the cuff. So the sleeves are a tad too long. Anna had the brilliant idea of turning the cuffs back - I had been despairing, but this has totally saved the day!! And thank you Anna for these great photos!


I didn't use the instructions that came with the pattern at all. Instead I followed the sew-a-long to the tee. And I will for my next one (fabric is drying on the line for it) and the next one (a yet-to-be-purchased chambray). What can I say? If you are thinking of making this pattern, use the sew-a-long. It totally demystifies every single step of a button-up shirt. Including the collar stand. It is, in all honesty, pure genius.

So - what do you think? My paisley Archer. I think I love you.


Thursday, August 1, 2013

Diamonds Are Forever

I was trying to think of a sassy blog post title involving jewels, but couldn't think of one, so this is the Diamonds Are Forever dress.


This is about as 'bling' as I'll ever go - I'm not really into sparkly jewellery, but as soon as I spotted this fabric in Tessuti, I had to have it. The colours are amazing, and this jersey is thick and extremely soft at the same time. It was only $22 a metre too! Down the cheaper end for Tessuti.

I made it up in the Dixie DIY Ballet Dress again for me. I must admit, I wanted another one after seeing everyone's Lady Skater dresses popping up everywhere. I think the patterns are pretty much the same, so instead of buying the Lady Skater dress, I went back to the lovely Ballet Dress Pattern.


I don't really have anything to add after my previous review. This is a simple pattern that uses knits. It came together easily for me as I had adjusted the pattern during my first make.


I have enough left over to make young Little M a t-shirt or a little dress. I'm cutting out a bunch of stuff for her at the moment - have some Alannah Hill jersey that is gorgeous for a dress and some bright cottons for shorts for the upcoming summer. Also some really, really cute cotton from Tessuti for a little Oliver & S dress. I've actually made a lot of stuff for her over the past few months, but find it hard to post about it as Michael and I have a 'no face' on the internet policy with her. Would you be interested in the garments on hangers? They are pretty cute.

I have a few things I've made lately to show you - but I am really excited as this Tuesday I am having a private lesson with Vanessa Lucas to finish fitting and adapting my tailored blazer pattern. It is a vintage 70's blazer with wide lapels. Once I have my lesson with Vanessa, I am going to be obsessed with sewing the blazer I think! Although I also want to sew the Sewaholic Saltspring Dress (even though it is a summer dress and it is freezing here today). What are you all sewing at the moment?

Pattern: Dixie DIY Ballet Dress
Fabric: 2.5m jewel jersey from Tessuti (got quite a lot left over though)
Notions: Stay tape
Size: Small
Alterations: Lengthened bodice by 7cm, took in sleeves by 4cm total.