Showing posts with label pattern alterations. Show all posts

Sunday, November 2, 2014

Alice - the Dress AND the Top.

So... I made myself a 'set' of sorts. I made the new Tessuti Alice Pattern in both the dress and top options, in the same fabric (also from Tessuti).


Am I weird? I have feeling I am. 

When this pattern came out, I knew I would make it in this lovely linen from Tessuti (all sold out, unfortunately). I bought 3.2m of it a while back, thinking I'd make a maxi dress. I changed my mind - a sewist's prerogative, I say!

Let's start with some pictures of the dress:


I made the top and dress simultaneously, so will discuss them together. The length of the skirt portion in both the top and the dress is very long  - I used a 10cm hem for both (5cm doubled over) - so perhaps think of shortening if you are shorter! I am 173cm for reference.  


I cut a size small, however, it was enormous. I do measure closer to an extra small in the Tessuti Patterns these days, but chose to cut the small because I have swimmer's broad shoulders (I don't swim except for leisure, but was told constantly as a young person that I have a swimmer's physique). 

Unfortunately, I found out the size small was too big when the dress AND the top were completed, bar the hems. Gosh I was cranky at myself for not trying on during sewing. I unpicked the arm band/cap sleeves (overlocking, under stitching, all stitching!) and took them in under the arms by 5cm on each side. That meant I also had to take in the arm bands by 5cm on each side. 

The linen I used is quite lightweight and ever so slightly sheer, so I used a white linen to line the yoke and cap sleeves/arm band thingies. Colette from Tessuti also mentioned on Instagram that the linen size small she has made 'grew' by an additional size - mine however was much larger than one size difference. I can't honestly say if it is a sizing issue or a fabric issue. I do plan on making more of these, and will cut a size small, but try it on before I sew on the arm bands. It is easy enough to take in - if you don't sew on the arm bands first!!


Maybe a tiny pregnancy vibe? No, I'm not :-)


I really love both the dress and the top. The fabric is divine - it, and the Alice pattern remind me of Gorman's current collection. I love everything in the current Gorman season. I think I will wear both of these a lot this summer - will you be making one?


Sunday, June 15, 2014

My French Jacket

I think last year when Melanie posted about making her French Jacket the entire blogging community went a little French Jacket crazy. I promptly bought Vogue 8804, the Claire Shaeffer French Jacket pattern, and then put the pattern away. I bought fabric for it at Christmas, courtesy of my Mum.


The pattern and the fabric sat in my pattern drawer until just after Sewjourn last December, when I saw Leith's version as a work-in-progress. Seeing her's spurred me on and, nearly six months later, I have a French Jacket.

Let's start with my muslin.


This is a terrible photo, sorry! I started with a size 12, which is my standard size in a Vogue Pattern. Overall, the fit was okay, however, I made three adjustments to get a closer fit and the look I wanted:

  1. Starting at the CB bottom, I took about 3cm in total out of the CB up until about half way up. 
  2. In the jacket side front and starting at the shoulder seam, I took about 3cm out of the princess seam, until about 10cm down (ending just above my bust). 
  3. I trimmed off the button placement allowances. I wanted it to close with hooks rather than buttons, so I just left a 1.5cm seam allowance on top of the CF.
I figured if it needed any other adjustments, I'd do them as I sewed the jacket. There were no glaring fit issues so I figured minute fitting could be done as I sewed. 

My muslin sat in a box for about two months. I just couldn't concentrate on it. Then, one day, about 2-3 months ago, WHAM! French Jacket sewing was all I could think of. 

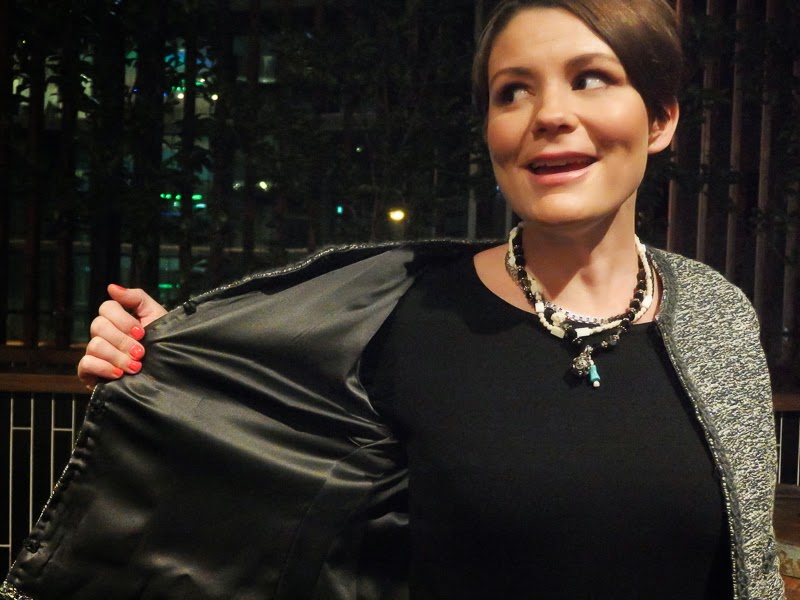
If you follow me on Instagram, you'll have seen some progress shots. I'm going to start here with the finished shots and then show you some progress shots. I wore it for the first time to my sister's engagement party, which was last weekend. 


I wore it with a black ponte Vogue 1314 - I'll review this dress again in another post soon.


Can you tell I'm a bit pleased with it?


Those buttons. I love them. They're from Buttonmania and I want a million more.


The lining. Silk satin. Such beautiful stuff. So easy to sew for a silk.


The venue was actually so overheated that I wore the jacket for these pics and then took it off. I lovingly placed it on a table at the back of the venue and nearly had a heart attack when I went out there about an hour later to get my lippie and discovered it under about 20 jackets. I felt like doing a mother lion roar and yelling "this is my FRENCH JACKET, DON'T TOUCH IT"!!! Instead I secured it in a safer spot and went and got another champers. 

So... a few changes I made to the pattern:
  1. I didn't quilt the lining and shell fabric together for two reasons. One, I did a practice quilt on some scraps of fabric and it showed way too much on the outer of the shell. I didn't like how it looked. Two, after consulting with Leith, we both thought that in the 'Making of a Chanel Jacket' video clip on YouTube that they do not quilt the jacket in the video. That made me think that Chanel jackets are not always quilted together. 
  2. I interfaced the jacket pieces (not the sleeves) using a very soft and fine fusible interfacing. The difference to the tweed was amazing. 
  3. I reinforced the sleeve head. The tweed I used was so soft and fine that the sleeve head was collapsing on itself. 
  4. I put trim all around the bottom hem - V8804 doesn't call for that. 
  5. I put very slim shoulder pads in. Again, I think the tweed really needed them. 
Here are some progress shots:


First bit of trim I sewed on. 


Pockets completed. You hand stitch the pocket lining on. 


This is my one regret - I wish I had attached the trim on the sleeves closer to the bottom of the sleeve hem. There is a little bit too much fabric showing under the trim. 


Getting there! At this stage there no machine stitching left to do. All hems are hand stitched, all the trim is hand stitched. I loved it. To me, this project signified hand stitching, and lots of it. I wanted such a project. I really love hand stitching. It is therapeutic to me and I think achieves greater accuracy in detailed projects like this.


Final stage here. Attaching the metal chain to weight the hem. I still cannot believe how much this little chain makes a difference to the way the jacket hangs. It is not a step to be missed.

I thought I'd also include where I sourced everything from:

  1. Tweed fabric, silk-satin lining, interfacing and slim shoulder pads: Tessuti Fabrics. 
  2. Mohair braid trim: M&J Trimmings in New York. 
  3. Buttons and French Jacket hook and eyes: Buttonmania.
  4. Chain trim for hem: Clegs. 
  5. Fleece for sleeve heads: an old jumper of my daughter's. 
Finally, I used a few resources A LOT:
  1. Every single post Poppykettle wrote about making hers.
  2. Couture Sewing Techniques by Claire Shaeffer. 
  3. Goodbye Valentino's posts about making her own.
  4. A Threads article about sleeve heads that I now can't find anywhere.
  5. A bucket load of internet resources, including blogs for inspiration and tips. I looked at other sewists' versions of the French Jacket constantly, and at images of Chanel Jackets. I also constantly looked at the white version Cate Blanchett wears in Blue Jasmine after I saw the film last year. I love that white Chanel Jacket. I cannot wear white like that until Little M has moved out of home. 
So there you have it! I made a French Jacket! And I love it. I'm slightly afraid of wearing it, but plan to tomorrow to work. 


I also really want to make another jacket now too. Bellatrix, I'm looking at you....


Friday, March 14, 2014

Let's Par-tay: Simplicity 1873

I mentioned in my second-last post that a little while ago I asked my Instagram friends to weigh in on whether I should sew Simplicity 1688 or Simplicity 1873 for my sister's first engagement party (a dinner at Seamstress Restaurant - how befitting!):


Overwhelmingly (apart from two people!) the answer was 1873. Well, you already know that I mashed up the two patterns to make a sheath, but I also did as I was told, and made 1873 for the engagement dinner!


This one is made from an amazing mid-weight Italian cotton with some stretch from Tessuti. I lined the bodice only in blue anti-static lining, also from Tessuti. 


Here are the changes I made :
  • I took 10cm out of the neckline - a standard adjustment for me, but I do wonder what is going on drafting wise. 
  • For the under arm seams only, I used a 2.5cm seam allowance tapering to the standard 1.5cm at the waist.
  • I took a 2cm horizontal dart out of the skirt the entire way around as I had some very odd pouching just above my hips. 
  • I extended the back darts by about 1.5cm as I had excess fabric there. 
  • I lengthened the skirt by 10cm so that I could keep it short with a 10cm hem. I like a really deep hem (5cm turned up twice) in a full skirt. 


This is actually really comfortable. The bodice has some ease in it so it is excellent for eating a huge meal in. Ruth's 30th Birthday dinner was last night - we went to Meat & Wine Co. in Hawthorn. I've been to the one at Southbank a couple of times for business lunches, but the one in Hawthorn is a bit nicer in my opinion. The decor is a bit fancier. I had a very good steak. And a creme brûlée. Then we went back to Ruth's house and played cards for a while. Little M was at a sleepover at her mate's house - although she's had a few sleepovers before, I still feel weird coming back to the house without her there. And my stupid body clock woke me at 7am. Grrr. 

So this is my par-tay dress! I haven't really been sewing for myself of late. I have had lots of birthday presents for kids, and Little M's birthday dress and leggings. I have toiled the Sigma Dress by Papercut Patterns and am really hoping to start that this weekend. Wish me luck!


Monday, February 24, 2014

Cynthia Rowley Mix-Up Dress: A Sateen Sheath

It has been a month since I last posted! And just over a month since I returned to work. Hmmm… I'm doing 4 days a week for this semester only. I'm lecturing again - a first year course with a lot of students (about 200). Dipping my toe back in the lecturing pond has been both exciting and exhausting. It's been almost 5 years since I last lectured in Queensland - I'm on a bit of a (re) learning curve. Plus I really have extremely limited time to sew. Little M is with Michael on the fourth day, and I don't think has completely adjusted yet. Despite him being her father and being an excellent, hands-on, caring, wonderful father. The mother-kid relationship is certainly an intense one!

Anyway, I'm sure you'd much prefer to hear about my dress! A while back I asked my Instagram friends which of these patterns I should make for Ruthy's (my sister's) first engagement dinner:


Interestingly, everyone bar two said 1873, with the full skirt. I did make 1873 for the engagement dinner (post on that to come!) but I got obsessed with having a dress with the slim skirt. I really liked the skirt portion of 1688 but felt the bodice was not what I was looking for at that point in time. So I spliced them together:


Okay, be honest please. Is the placement of that bottom white flower a bit interesting…….?! Michael assures me it is not, but I have paranoia. I do wish I'd spent more time cutting and thinking about the placement of the print.


The fabric is a cotton sateen from Tessuti - one my mum gave me for Christmas. Ruthy tells me it is a Ted Baker print. It is gorgeous anyway!


I had to make a lot of alterations to get this to fit nicely. Here we go:

  • I took 10cm out of the neckline - a standard adjustment for me, but I do wonder what is going on drafting wise. 
  • For the under arm seams only, I used a 2.5cm seam allowance tapering to the standard 1.5cm at the waist.
  • I took a 2cm horizontal dart out of the skirt the entire way around as I had some very odd pouching just above my hips. 
  • I extended the back darts by about 1.5cm as I had excess fabric there. 
That's only four adjustments - but it felt like a lot. The only thing I am left wondering is whether I should alter the bodice so it is not so cut away at the sleeve-armhole area. The straps do not seem to come in so far on the model in the pic - what do you think? 

I also lined the entire dress, and because I forgot to lengthen the skirt, I bound the hem and sewed it by hand (I would have done it by hand anyway, but usually I turn up the hem twice). 


Like the colour of my lining? Only colour I had in my stash - but I love it!

I really do like this dress and have another one half made (has been half made for some time….). I wore it to work today to attend orientation for my students and felt pretty swish. Professional but young(ish) and not too conservative. I do need to get used to not wearing a sack though. I wear them so often that when I wear anything fitted I feel exposed. Does anyone else have this issue? Which do you prefer a sack or a more fitted garment?

Wednesday, January 1, 2014

L-O-L-A Lola! (As a Dress).

First garment for 2014! Recently I signed on for both Pinterest and Instagram. I felt a bit left out of all the cool behind the scenes crafting conversations that were taking place - and like I needed to build my social networking empire more (cue image of me doing a Dr Evil-pinkie to the mouth-type pose).

Anyway, I kept seeing images of very funky striped t-shirt dresses. I became obsessed. I had to have one.

Luckily for me, Tessuti released their Lola T-Shirt Pattern. I bought it, figuring I would simply extend the shirt into a dress. Readers, it worked. All I did was lay the shirt pattern pieces on some swedish tracing paper and very crudely hand sketch them into dress length. It is THE easiest thing I've ever done to a pattern. Here is what I ended up with:


I made a size small with a medium at the shoulders only. I really did not want the sleeves to creep up.


The fabric is a lovely viscose knit from Joys Fabric Warehouse in Geelong.


The stripes were way too irregular to try and match.


I don't know if you can tell, but I accidentally cut it slightly off grain. Whoops!


This pattern came together well, as do all Tessuti patterns. I am fortunate in that I can generally make the size small with no or only minor adjustments.

I think you'll be seeing some Lola Tees in my future, and possibly another dress a la Anna's adjustments. It is such a great basic pattern, and perfect for knocking about with my kid. I wore this to her doctor's visit this morning - turns out the poor lass has an allergy to sunscreen (not just the sunscreen itself but the volume of sunscreen applied) - this is pure torture for Little M, as putting on sunscreen is one of her favourite things to do. She even pretends all manner of things are sunscreen - a banana, a small glass jar, a face washer, you name it, it becomes sunscreen for her to apply to herself, others, and every doll or stuffed animal she owns. How on earth am I going to break it to her that she has to lay off the stuff?